
Why HDR is a valuable tool for the photographer.
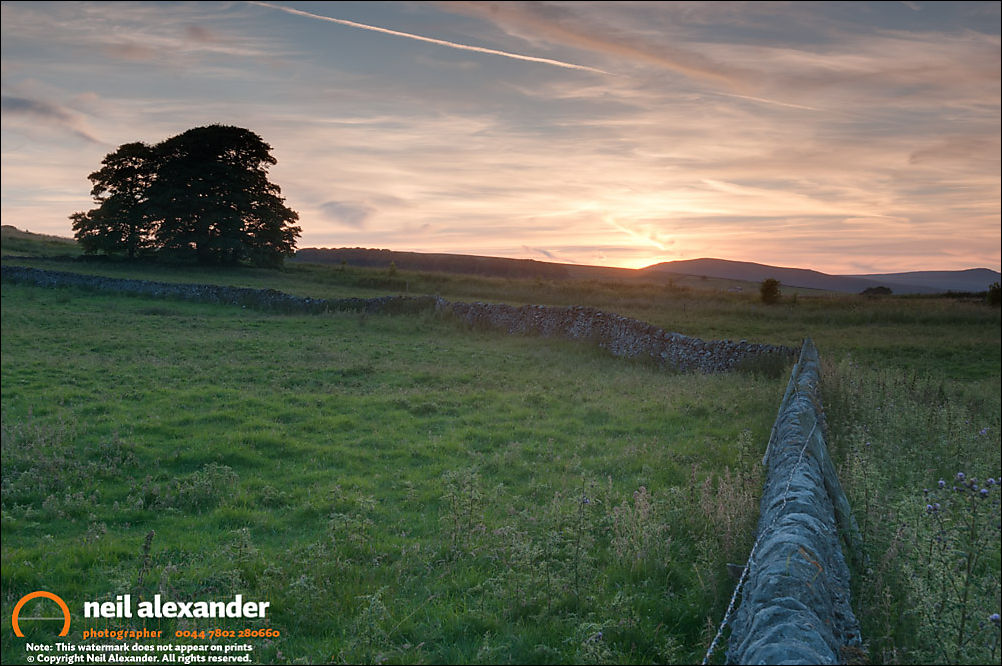
Lonely tree at sunset, near Bakewell, Peak District. Photographed with 24mm TS Lens. Bracketed exposure processed in Lightroom and LR Enfuse.
I regularly read statements from other photographers stating that they hate HDR. That it all looks so over processed and downright wrong and they’d never ever go there, but I have to disagree. In my opinion the ability to combine different exposures into one final image is a particularly important tool in the photographer’s arsenal. It all depends on the method that you use. I’ve tried Nik’s HDR Efex Pro, Photomatix's HDR Soft and Photoshop, but my go to HDR application of choice is the LR Enfuse plugin for Lightroom. The fusion plugin creates a far more realistic conversion than any of the other programs do by default. I’m sure that with some careful tweaking you could get any one of the others to do the same thing, but LR Enfuse does it straight out of the box. Over time I’ve tweaked the settings slightly but it still beats the others hands down in my opinion. The additional ability to batch convert groups of images is also a huge time saver I’ve found. In Lightroom you simply group all the bracketed exposures you want to use, check the batch more processing option and off I go and have a brew or two.
Below are some sample images processed in their respective applications using the default settings.
There’s just too much clarity, over processing and just eugh for me. As a result the first thing I find myself doing is trying to tone them down. Pushing the sliders the other way just results in images that are simply put, frightening. And it’s these over processed, dayglo nightmares that give HDR a bad name. Just search Flickr for HDR and have a sick bowl at the ready.
An example of LR Enfuse default processing

An example of Photomatix's HDR Soft default processing

An example of HDR Efex Pro default processing

An example of Adobe Photoshop's default HDR processing
Only the other day I was working a job for a local pub which has just undergone an extensive make-over. I’d done the interiors one day, some lovely sunset shots another evening but the client also wanted some images of their new beer garden in the sunshine. This meant that I’d be shooting in the worst light possible - the midday sun. But in the middle of a lovely sunny day is when people are most likely to be looking for a beer garden to sit in and enjoy a nice cold pint, and of course, the client is always right. Eek! Flash was out. I’d have needed more power than the Hadron Collider to produce enough light to cover the necessaries and over power the sun, so combining bracketed exposures* was the only way to go. A “correctly” exposed image simply blew the sky off the chart. Tweak it the other way and parts of the building were total black, but by shooting bracketed exposures I was able to merge these in LR Enfuse back at the ranch and produce images that were far more akin to what my naked eye was seeing. The reason being that the naked eye can see a range from dark to light over roughly 27 stops, but most digital camera sensors can only see between 9 and 13. So if I’m looking at the scene below of the lone tree at sunset in the High Peaks, my eyes can see the details in the sky of the clouds and the vapour trails and at the same time it can see detail in the tree. The camera can’t. It’s a technology thing. Digital sensors aren’t anywhere near as good as the marvellous feat of engineering that is the human eye, yet. So if I set the camera to expose for the sky, then the tree is in total black with little definition, and vice-versa, if I expose for the tree, then the sky ends up completely white. So by making a series of exposures across the spectrum, the software back on my iMac can merge them all together and produce a “realistic” image.
Anyway, that’s my two cents on the subject. HDR is a tool like anything else; tripod, lenses, software, they-re all their to be used how you see fit. Discount them at your peril.
* Bracketing exposures means taking a series of images of the same scene but under and overexposing. My ageing Nikon’s will, with a quick toggle of a dial, shoot a series of up to 9 bracketed images, 4 stops over and under. This used to be my method of working but I found that I often ended up with tons of images in the bracketed series that I simply didn’t use. If it’s a 4 stop over and under bracket that I need, then I’ll manually dial in the exposures and shoot -4, -2,0, +2 & +4 meaning that I’m only filling the card with 55% of the space I was previously using. Over the course of an extended shoot, this can be GBs of data I’m saving. But that’s my preference. Auto bracketing works very well too!
Lonely tree at sunset, near Bakewell, Peak District. Processed in LR Enfuse and Lightroom.